Despite the advances in technology, the circle sawmill blade will still experience the following problems at some point. These tips and tricks will help narrow and resolve hard to pinpoint saw problems while being a simple and straightforward guideline to follow.
Once a mill gets some age to it, and millions of board feet have run over it, it can be hard to pinpoint little blade problems. A lot of times sawyers point to the setworks whenever there are inconsistencies, but you need to check your saw and collar too.
The common areas you need to check for on older sawmill problems are the collar, plumbness of the saw, and of course lead of saw. Let’s dig into it.
Saw Collar Basics
The saw collar holds the saw on the mandrel, but more importantly, it also gives support to the saw blade. Most manufacturer’s like Montgomery use 8″ collars nowadays. The larger collar gives better support; thus, the more stable the saw will run.
Some manufacturers of sawmill equipment furnish mandrels with flat collars with one collar concave, usually the outside one, and one collar flat, the inside one. It’s recommended matching both collars with a slight concave about 0.020”-0.030”, or from the periphery to the edge of the recess), or (1.5 to 2 degrees off of parallel of the flat bearing surface.) see Figure 1.
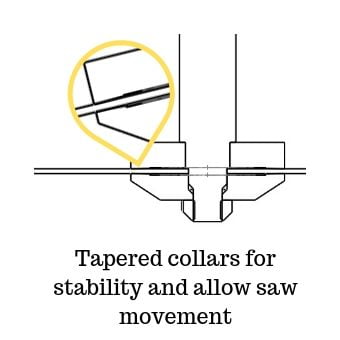
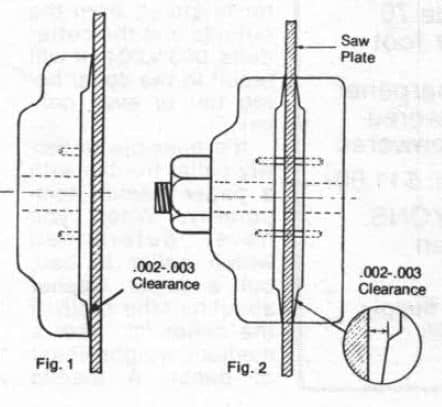
When the collars are tightened against the saw blade, they should have their most significant bearing force on the outside edge, see Figure 2.
Collar trouble is a very common problem, and as mentioned, it can be hard to pinpoint. Issues with the collar can even go unnoticed, but here’s a quick way to test and check your mill. Remember to power down and lockout and tag out.
- Keeping the saw stationary, loosen the guide plugs.
- Loosen the mandrel nut on the arbor.
- Tighten the collar nut by hand so that the loose collar is snug to the saw.
- Re-set the guide plugs, so there is 1/16″ clearance on either side of the saw.
- Slowly rotate the saw to see if it leads in and out in comparison with the guide plugs.
- Without moving the saw, tighten the nut with a wrench your usual manner, being careful not to move the saw.
- Check the distance between guide plugs and saw, did they move?
- Try the rotate test again and see if it stays true.
Results from the Quick Check
If the saw is closer to one plug than the other (rubbing), the saw has become dished, due to a worn or damaged collar, which should be repaired or replaced.
Refacing the Collar
When refacing collars, you should start at the recess and work toward the periphery. If this method is used, any cutting tool wear experienced will result in the concavity. On the other hand, if the cutting tool is started from the outside and the tool dulls 0.003″ – 0.004″ it will result in the collar being flat or convex.
Temporary Collar Repair
It’s possible to rectify collar trouble with a paper washer temporarily. After determining which collar is bad, cut a paper washer about half the width of the collar lip (1/2″ – 3/4″ wide), from a medium weight paper.
A manila envelope is usually perfect. The paper washer diameter should be as big or a little bigger than the diameter of the collar. You can cut the excess off after tightening the mandrel nut on the outer collar. Also, you can attach the paper washer to the collar with lightweight grease. see Figure 3.
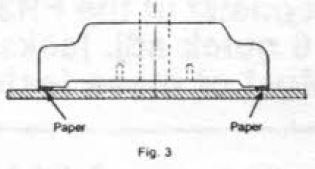
Figure 3
If the saw is dishing toward the husk, the paper washer should be attached to the back collar. If the saw is dishing toward the log, then the paper washer should be attached to the loose or outside collar.
How to Check for a Plumb Saw
To cut good lumber, the carriage and carriage blocks should be level, square, and a plumb saw. If the carriage is good, but the saw is not plumb, the last cant or board can be wedged shaped from edge to edge. Do not try to correct this with the saw guide; it will cause the saw to heat and affect performance by weaving or snaking through the cut.
When the saw is not plumb and leans toward the carriage, the saw will tend to lead into the log. On the other hand, when the saw is leaning toward the husk, the saw will tend to lead out of the log.
A simple check is to shut down and lock-out-tag-out power, then drop a plumb line and bob along the saw face while, missing the collar, and hooking the line over the top of the saw at the shoulder, see Figure 4. The line should not touch anything but the metal plate of the saw. Not the shanks, teeth, or collar. see Figure 5.
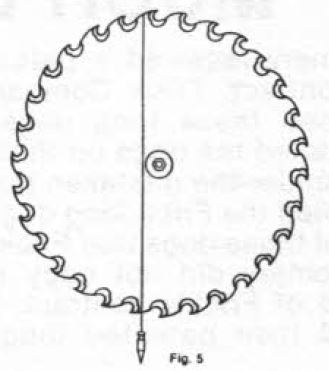
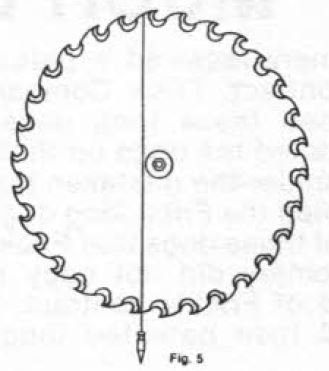
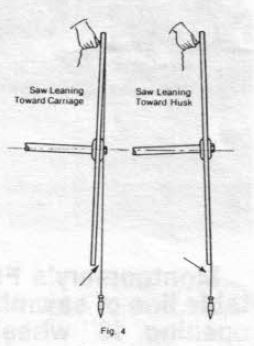
Figure 4 Figure 5
To make the saw plumb, just adjust the mandrel bearings with spacers and or wedges to level the mandrel. Leveling the entire husk may be more desirable. Regardless of which method is used, a plumb line should be used to check the saw.
A level isn’t a proper method for checking plumb of a saw because the saw blade is dished. The dish comes from the tensioning of the blade so the metal disk will stand straight while turning up to RPM. Using a string allows you to go the complete distance, unlike a level that may not be centered in the dishing. Another thing you can push on the saw while trying to hold the level to it and distort the dishing.
Improper Lead of a Saw in the Sawmill
Improper lead is a great cause of saw trouble. To overcome the tendency of the saw running out of the log while slabbing, and to give clearance on carriage return, the mandrel should be adjusted slightly so that the saw will lead into the log. Often times a saw will heat and dodge in the cut or behave like a saw in need of tensioning or hammering because of improper lead.
A simple method for checking lead are as follows
- Pick a tooth and mark it. Now measure the distance between the tooth corner and an end of a carriage block.
- Move the block to the opposite side of the blade and rotate the saw so that the marked tooth is at the same carriage block.
- Now, measure again. About 1/16” is the standard nowadays for the correct amount of lead (in a 56″ saw) on most sawmills, see Figure 6.
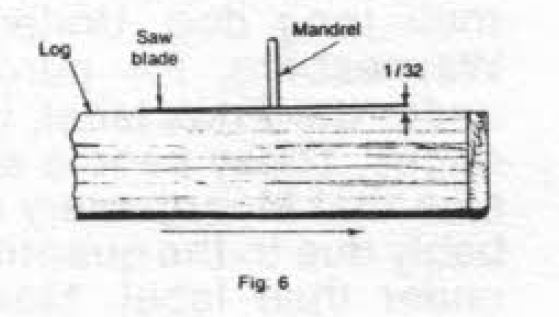
You may need to adjust it in or out to give optimum performance. Lead can be anywhere from a 1/32” to 3/32 and still be set up properly.
Adjusting the Lead
The lead is adjusted by moving the saw end of the mandrel left or right. This is called “sluing.” Never attempt to adjust the lead while the saw is running. A mandrel with three bearings will be easier by only adjusting the front and back bearings allowing the middle bearing to pivot.
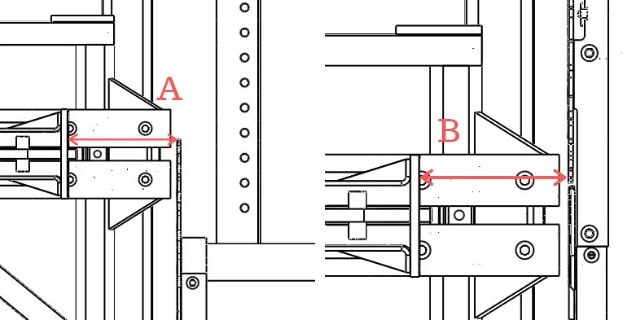
If too much lead is in the saw, the boards will rub on the blade before the splitter. This can heat the rim of the saw, causing it to dodge, even when sawing small cants.
A shiny rim on the saw can often times be a sign of this condition. Too little lead will create heat nearer the eye of the saw and cause the saw to lead in or out. A shiny area on the saw body can often indicate this condition.
When changing lead, it is essential to loosen all the mandrel bearing to prevent a distorted mandrel and premature bearing wear. Belt tension should be released to adjust lead as well.
CAUTION!
All maintenance of sawmill equipment should be done with the power off and lock-out-tag-out devices used. Safety First!
Need More?
Hopefully, we were able to give you some insight and enough information regarding how to troubleshoot old circle blade sawmill problems within the following areas of collars, plumbness, and proper lead.
If you read over this and you are still having problems you may need more info or a replacement part? Feel free to reach out to us with further questions or issues you may have.
You may want to look at our new equipment while you’re here, click here to give it a view or two.
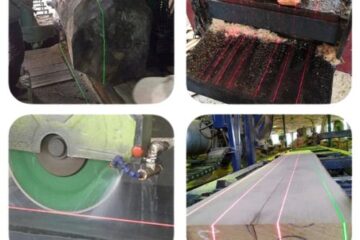
Look at our prices on Laser Lights for your head saw, or edger. We have Green and Red. Learn more about what fits your need by reading Laser Line Colors for Sawmill Use: What’s Right for You

20 Comments
David · October 10, 2020 at 11:43 pm
Good information . Thanks
Kenny · October 29, 2020 at 5:28 pm
I just came into position of a 00 frick sawmill with a 54 inch circular blade..Trying to remove blade, nut will not move…any suggestions on the best way to remove nut holding blade on?
William Montgomery · November 5, 2020 at 11:34 am
Well, Is it a Left Hand, or Right Hand? (do the teeth point counter clock wise, or Clock wise? When standing on the track) If facing counter clock wise, it should be a Right hand thread (lefty loosey), If it points clock wise, it would be a left hand thread. I have had to take an oak 4×4, and use as a hammer on the end of the wrench. You can apply a little heat on the nut only, and some penetrating oil as well. fill free to ask anything else.
Michael Peppers · September 7, 2021 at 8:33 pm
Have an old Edmiston set works on a frick carriage, 56” blade 671 dd cutting pine, just got it back together, carriage is wanting to jump track away from blade. Help
William Montgomery · September 27, 2021 at 7:42 am
We emailed you a reply, hope it helps…
steve · October 18, 2021 at 9:05 am
good deal
Billie-Jo Siegel · March 15, 2022 at 6:25 pm
I have a hydraulic Edmiston Circular sawmill. The dogteeth will let go after the hydraulic oil warms up from running. Any idea what is causing the dogs to let go? We called Edmiston and they’ve had us change two cylinders and a valve on the carriage, but we are still having the same problem.
William Montgomery · May 5, 2022 at 9:37 am
I sent you a direct email (if you received it) I believe the pump may not be getting up to pressure once the oil warms up. When the oil warms it get lesser viscosity and therefore can bypass around the wear in the pump. Take a gauge and put it on the pressure side of the system to evaluate pressure readings when cold, and warm.
Tom Ellenbecker · July 6, 2022 at 2:32 pm
why does 48″ inserted tooth saw keep throwing sawdust me when i am sawing.
William Montgomery · July 7, 2022 at 9:12 am
The lead on the saw, The plumbness of the saw to the track, the saw collar is messed up, and, or saw needs hammered? If the saw is blowing dust off the top toward you it means the back side of the saw is rubbing the log typically. which if it never was before and now it is? something may had moved and the lead is off. Feel free to reach out if you need.
Dean Peddle · September 11, 2022 at 9:06 pm
how much lead for a 30″ circular saw blade with insert teeth?
William Montgomery · November 19, 2022 at 11:59 am
30″ is a small diameter…I would start at 1/32″ and adjust accordingly…hope this helps
Wayne · September 26, 2022 at 10:43 am
Soooo… Our Frick model 0 we run at a local park needs attention. I checked the collar on the mandrel and the outside one, and both were flat. I have a lathe and think I can fix the outer collar, but how do I machine the one that is a zero tolerance fit to the mandrel without taking the mandrel off?
Thanks in advance for any help.
Wayne
Wayne’s World Garage on YouTube.
William Montgomery · November 19, 2022 at 11:58 am
The way we use to do it is with a lathe tool rest body rigged up on a piece of sturdy tube steel that ran across the track (you may have to shim the tube to be square with the mandral) Feel free to call in if you need.
With this set up you turn on the mandral and machine your needed profile. It is slow RPM compared to an engine lathe, but it can work as long as there is no hard spots.
Jeff Winslow · February 16, 2023 at 11:22 am
I have a 52″ HMC, cant get the feed rate up over 100’/minute. I have seen these saws cut 200fpm.
I checked the lead and I’m getting .180″ I’m going to adjust it to .060″. Do you think that is too little Lead? Should I go to .100″ and see if its any better or just go to the .060″ There is definitely a shine on the rim. I don’t know much about circle saws in a sawmill but this seems like excessive lead.
William Montgomery · February 18, 2023 at 9:42 am
I would go to a lead of .060 to .065″ lead. The real question is; What is the saw doing when you try and feed it more? Does it lead in, or out? Does RPM slow? If it saws fine at 100fps, but the RPM slows, then the tension in the blade changes and can walk in the cut. Feel free to get back with us.
Justin Shoemaker ir · May 3, 2023 at 9:21 pm
If anyone know our circular saw starting today we are having a problem trying to figure a thumbing noise. In the carriage you can hear it and feel it but we can’t figure out where it’s coming from. Do u have any idea on what it could be.
Brad Patterson · December 7, 2023 at 12:32 am
I have a 56 inch Hurdle saw. I am very new to the sawmill industry, I have talked to several older sawyers that have given me advice but it seems to contradict each others advice. Could you email me so I can ask you some questions about adjusting certain things to make saw cut more efficient?
Duane Northrup · November 10, 2024 at 9:35 pm
I have a 56″ saw that is jumping past the riving knife at the end of the cut. What would be causing this to happen ?
William Montgomery · November 11, 2024 at 9:53 am
This is typically cause from heat, heating the saw and making it pop over. The heating can be caused by; bad shanks not clearing dust, out of lead, not hammered correctly or needs tensioned to your RPM, saw collar not holding saw properly, and carriage / log moving in the cut forcing/rubbing on the saw to cause heat.